
It’s Thanksgiving-eve, and the height of pumpkin everything season, so I thought I would share some of the pumpkin recipes I’ve been working on over the past couple of weeks. The best part is that all of these recipes are made with REAL pumpkins!
Did you know that canned “pumpkin” is really not pure pumpkin? Even if it says “100% pure”, chances are it is actually a mixture of other squashes. The USDA is lenient about what constitutes “pumpkin”, and approves labeling a product “pure pumpkin” so long as it contains either pumpkin or squash (such as butternut, Hubbard, Golden Delicious, and Boston Marrow). So, who knows what you’re really eating when you use the canned stuff…
Learning that was reason enough for me to try my hand at roasting and baking/cooking with real pumpkin. I was curious if there would be a difference in taste and texture, and enticed at the idea that using a real pumpkin was more nutritious than the canned alternative. Which means REAL pumpkin pie can be called healthy, right?
I came up with 5 recipes made with real pumpkin, fit for all your breakfast, lunch, dinner, and dessert needs. Scroll down to read the recipes (and see the mouthwatering pictures to entice you to make it for yourself!).
Here’s a sneak peak of the recipes below:
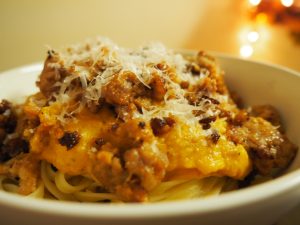
Pumpkin Pasta Sauce
Pumpkin Pancakes
Pumpkin Butter
Pumpkin Bourbon Pie
Pumpkin Bourbon Ice Cream
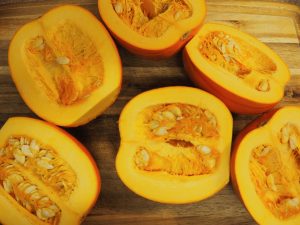
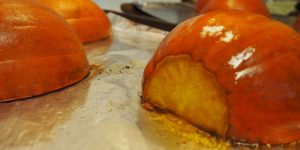
How to roast a pumpkin, since you’ll need to know for each of the recipes below:
Half the pumpkin, scoop out the seeds, and season (if necessary). Place the halves face down on a baking sheet, and bake in a 350-degree oven for about 40 minutes, or until fork tender.
Pumpkin Pasta Sauce
Credit for this idea goes to my sister, Megan. She was looking for a healthy, seasonal pasta sauce and started experimenting with some pumpkin and sweet potato. She came up with the base, and we perfected it together!
1 pie pumpkin, roasted and mashed
1 medium sweet potato
½ cup milk
1 tsp cinnamon
2 tsp salt
1 pinch of cayenne pepper
½ tsp white pepper
½ tsp garlic powder
1 tbsp Herbs de Provence
1 dollop of sour cream
1 pinch of black pepper
Cut the pumpkin in half and scoop out the seeds. Season it with olive oil, salt, and pepper. Roast the pumpkin in a 350-degree oven face-down for about 40 minutes. Roast the sweet potato for about 20 minutes, or put it in the microwave until tender.
Add pumpkin, sweet potato, and all other ingredients to a food processor. Puree until a thick, soupy consistency forms. Serve over pasta. (We added some sweet Italian sausage and freshly grated Romano cheese…delish!)
Pumpkin Oat Pancakes
½ pie pumpkin, roasted
½ tsp Cloves
½ tsp Ginger
1 tsp Nutmeg
1 tsp Cinnamon
1 tbsp Vanilla Extract
1 tbsp Sugar
2 Eggs
1 pinch Salt
1 cup Flour
1 tsp Baking Powder
¾ cup Milk
½ cup Oats
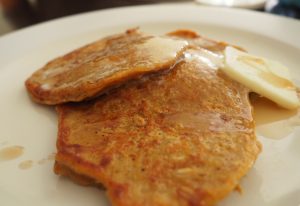
Mash the roasted pumpkin and add all other ingredients to the mash. Depending on the size of your pumpkin or how moist it is, you may need to adjust some of the wet/dry ingredients to ensure the consistency is right for pancake batter.
Scoop ½ cup of batter at a time into a buttered pan. Serve with butter and/or maple syrup.
Pumpkin Butter
2 cups spiced apple cider (I use Trader Joe’s brand…it’s got lots of spices. If you use a brand with fewer spices, you may need to increase the amount of spices you add to the recipe)
1 pie pumpkin, roasted
½ cup sugar
½ tsp nutmeg
½ tsp ginger
¼ tsp cloves
1 tsp cinnamon
1 tsp vanilla extract
1 pinch of salt
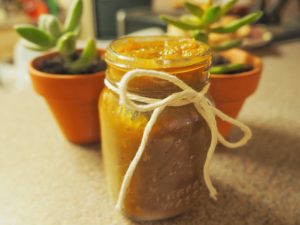
Mash the roasted pumpkin in a bowl and add all of the other ingredients. Using an immersion blender, make sure ingredients are well-combined and there are no lumps in the mixture. You can also use a food processor if you don’t have an immersion blender.
Pour mix into a sauce pan and cook over medium heat for about 1 hour, or until it reduces to a thick, spreadable consistency. Makes about 3 cups of butter.
This pumpkin butter makes for an easy and delicious favor (especially packaged in little mason jars). You can also mix this into oatmeal, serve it over ice cream, or (my favorite) spread it over a bagel and cream cheese.
Pumpkin Bourbon Pie
1 pie pumpkin, roasted
12 oz evaporated milk
2 eggs
¾ cup brown sugar
1 tsp cinnamon
1 tsp ginger
1 tsp nutmeg
½ tsp cloves
½ tsp salt
2 tbsp bourbon
1 tbsp vanilla extract
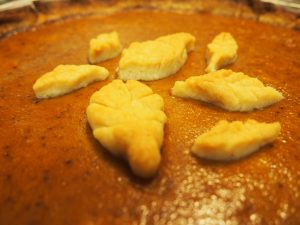
Combine all ingredients in a bowl, and mix with an immersion blender (or food processor). Pour into pie crust (I used store-bought…we can’t do it all on Thanksgiving) and bake for about 40 minutes at 400 degrees. Serve with whipped cream or vanilla ice cream!
If you have extra pie crust, you can cut shapes out of it and use them to decorate your pie. Take your pie out of the oven 20 minutes early, decorate as you like, and pop it back in for the last 20 minutes of baking.
This pumpkin pie base makes for a great addition to other desserts too…I’m using it to make Pumpkin Cranberry Bars for the holiday. Recipe to come if they turn out well!
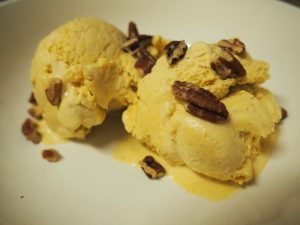
Pumpkin Bourbon Ice Cream
I can’t take full credit for this recipe—it is based off of a recipe from Bi-Rite Creamery. I made a couple small adjustments to make it my own, and I liked the way it turned out.
2 cups heavy cream
½ cup milk
½ tsp cinnamon
½ tsp ginger
½ of a pie pumpkin, roasted
6 egg yolks
12 tbsp brown sugar, divided in half
2 tbsp bourbon
1 tbsp vanilla extract
¼ cup raw pecans (for topping)
Combine half of the brown sugar, egg yolks, and spices in a bowl. Mix well and set aside.
In a saucepan over medium heat, combine the heavy cream, milk, brown sugar, and bourbon. Heat until the mixture reaches a bare simmer, then reduce the heat to low.
Take ¼ cup of the heated mixture, and slowly add it to the bowl of egg mixture, mixing constantly. Repeat this until you have added 1 cup of the cream. Then, slowly add the egg mixture to the saucepan, mixing constantly. Once the mixture has thickened enough to coat the back of a spoon, remove it from the heat and allow it to cool. Refrigerate the mixture until fully chilled, or overnight.
Once completely chilled, add the pumpkin and vanilla to the mixture. Mix with an immersion blender.
Churn in an ice cream maker according to machine instructions. Serve immediately, or chill in the freezer if you like firmer texture. Top with some raw pecans for an extra crunch!
Happy Thanksgiving, and Happy Pumpkin Season!